Cooktop and oven time.
As easy as the plumbing was, the harder this was…
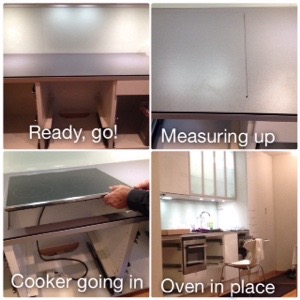
What we needed to do was cut out the hole for the cooktop. First we measured everything out. We put the cooktop upside down on the counter, in exactly the spot where we wanted it, drew a line around it, removed the cooktop and measured about 6 mm in from the line we drew, and drew up the cutting lines. The cooktop “lip” was only 10 mm, and we needed a tiny bit of wiggle room, so we decided to go for approx 6 mm so that the “lip” still had some support.
I told you my countertop consist of a 10 mm thick laminate, right? Well let me tell you, 10 mm of pure laminate is hard, super hard to cut in. I remember when we installed the original countertop, how my dad swore more than once over how hard is was to cut the darn thing with a jigsaw. Not only was it hard (I believe my dad broke a sweat and a blade) but it also took forever. So this time around I thought maybe I could use something else.
First I tried my Bosch Oscillation multi tool – effective, but still very slow going, so I figured… nahhh.
OK, what’s next…. well there is the grinder… Which is a scary effective product, and it’s fast, almost too fast. “Boy do you need a steady hand if your going to try that, because if you are just a tiny bit off, you’ll ruin everything”. Hmmm, would I, would I even dare to? Thankfully I still had the cut off from the original plate, so I could practise 🙂 It was fast… I decided to take a chance..
NOW, I would NEVER recommend anyone ever doing this, you would have to have a rock steady hand, and a sick amount of confident, and it can still go wrong, very wrong! So NO, do not ever use a grinder to cut out the hole for a cooker in a kitchen bench. Please use a jigsaw as the instillation guide will tell you to do.
Having said that, I used one! The only reason I even contemplated using one, was because I spent all summer last year cutting slate with a grinder (Summer project 2013 – putting down 56 square metres of slate at the front of my house). And I knew I could cut a straight line. Unless you use a grinder for a living, please do not be as insane as me 😉
I knew the grinder would produce an insane amount of laminate dust, so we covered up the area really well to try to keep the dust contained. Even so, it still seeped a little into my kitchen cabinets and onto the floor. This was not really a big deal, as I had decided that part of the kitchen “renovation” would also include cleaning all my kitchen stuff, and all my kitchen cabinets (saves me from doing it for Christmas).
OK, here goes, I’m all decked out in protective gear, mask, glasses and ear protectors. The kitchen is all decked out in plastic, tape and I have this big “bag” behind me that will collect most of the dust. And, I’m nervous! What if I muck this up?
Well, I’m proud to say – I didn’t 🙂
The hole got cut, and fitted to perfection. The cooktop slotted nicely into it’s hole, exactly as planned. Phew…
Putting the oven in it’s place afterwards took all but two minutes.
A good vacuum, and a washing later and this concluded the work for the day.
Only one more day to go…

Oh man, I am thinking I’d gladly pay someone to do all this, I would never have the patience!
LikeLike
🙂 I hear you… I’m pretty used to do most stuff at home myself (handy woman) and actually find it very fulfilling when I figure things out, so my default is to do it myself. Have to admit though, couldn’t have done it without the help from my friend.
LikeLike
It’s coming together really nicely!
LikeLike
Yes, I’m pretty happy with the result (even though it looks the same) – it had to be done… and it’s great to be done with it.. and have my kitchen back 🙂
LikeLike