The mad scientist!

Since I started on this minimalist path, I’ve been trying to stick with gifts that won’t end up stored away in a closet somewhere. Gifts that are either a replacement for something they need/use, edible, drinkable or at least a gift that can be used up somehow.

I was done with all my gifts a couple of weeks ago, but..ย  the other day I decided I wanted to add a couple of people I have never given to before.

I wanted to add one of the people that I use for some health treatments, and I wanted to add a girl I have gotten to know at the shopping mall, who is not feeling to good because of an illness.

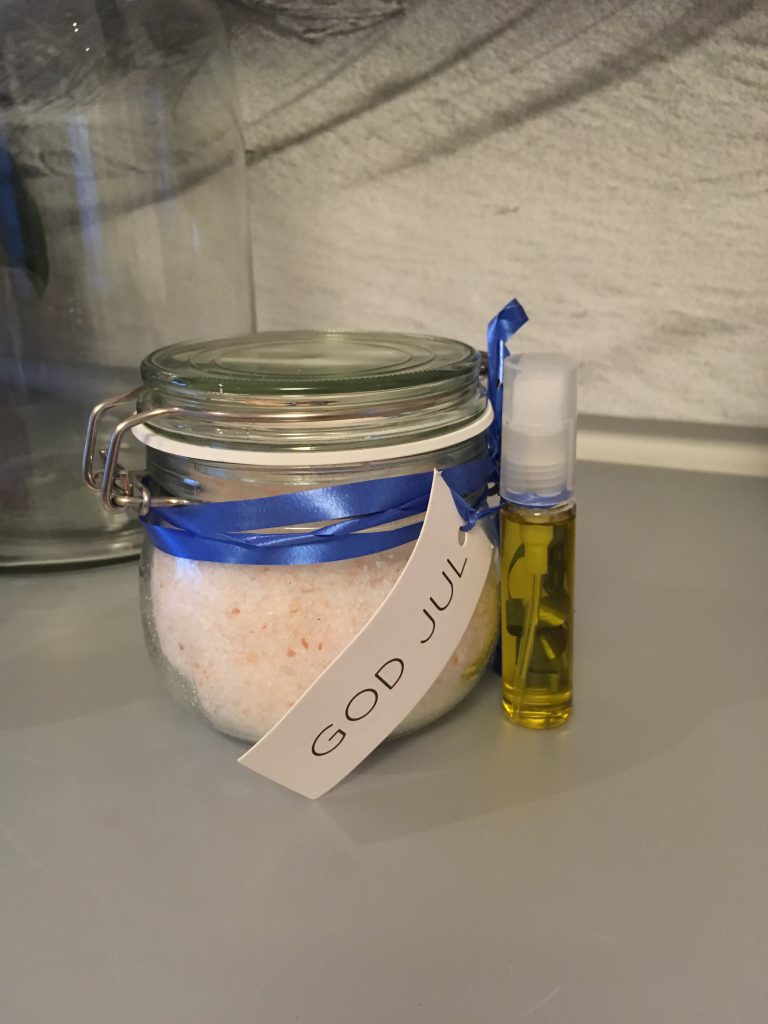
With the girl in mind, who is struggling with an illness, I decided, why not make something that will make her relax and feel good. So the other day I got a little “mad scientist” and Iย mixed up aย  batch of bath salts, for both of them ๐Ÿ™‚

While I was at it, I figured I needed to replenish my stash of face and body oil, so I got my box of goodies out and went to town.

Not only did I mix some body oil and face oil for me, but this time around, I even ventured into the uncharted territory of mixing up some shaving oil for B!

And you know what? B is really liking the shaving oil. According to him, it’s at least as good, if not even better, than the ones he has used before (he could just be trying to be nice..ย  ๐Ÿ˜‰ ) Anyways, there will be no more store-bought shaving oil… ๐Ÿ˜‰

Lets get back to the gifts! Since I had mixed up some new body oil, I decided to tie a small bottle on the bath-salt jars, to really make it a tiny spa treat.

I love mixing these bath salts, not only are they great for a soak and some me time, but their are also great to use to soak your feet (if you don’t have a bath tub).

Ingredients I used for this batch (2 jars) of bath-salt (it differs a little each time):
Makes enough for about 4-6 baths, or about 14-16 foot soaks.ย 

1 part Epsom salt (about 350 gr)
1 part Sea salt (about 350 gr)
0,5 part Himalaya saltย  (about 175 gr – I just wanted a touch of the color)
25 ml sweet almond oil (don’t want it too greasy
but just enough that it makes the skin feel good)

Mix inn some essential oil, whatever you like – I used:
5-6 drops of Lavender (relaxing and good for the skin)
4 drops of Blue Chamomile (calming, cooling and good for inflammation)

You can use any salts, in any combination.
And the almond oil and/or essential oils are options you can use or not. It is entirely up to you ๐Ÿ™‚

How to make it:ย 

Mix all the different salts with, almond and essential oils.
I leave the mix over night, spread out on a baking tray,
so that the mixture becomes “dry” and airy. (The salt draws the moisture inn)
When the mix is ready, I pour it into glass jars.

Note!ย 

Because of the almond oil and especially the blue chamomile oil,
it won’t smell absolutely wonderful when you open the jar.
In the bath though,it smells pretty good ๐Ÿ˜‰

Note 2/Disclaimer!ย 

As there is almond oil in the mix, be careful in the bath as it gets slippery.ย 

Also, you should rinse off the tub after use,
with some dish-washing liquid, as this will cut the oil.

If you worry about the oil, just omit it from the bath salt, as it’s nice without as well.

Need some me time? Why not give this a try ๐Ÿ˜‰ย 


A “little” bit of help…

When you last heard from me, I mentioned that we had been working a bit at my stepmoms place as she wanted underfloor heating installed.

My plan was to make a blog-post about it as soon as we were done, but something came up and B and I had to jump on a plane to England to help out my mum (nothing serious.. she just needed a little help). We came home a couple of weeks ago, with a little gift… the flu ๐Ÿ˜ฆ

Not only had we been infected by someone on the plane… but unfortunately we managed to give it to my mum as well, which she really didn’t need.. poor girl ๐Ÿ˜ฆ

It’s taken a while, and I’m still sniffling like crazy.. but at last.. I’m back on the computer, so I thought it was time for that blog post about the work we have been doing ๐Ÿ˜‰

My stepmom lives in a building with several condominiums, it’s an older building and when it was built, it was not common to install heating cables in the floors. Today however, underfloor heating is pretty much the norm here in Norway (it gets cold you know ๐Ÿ˜‰ )

As my stepmom was getting tired of freezing here little feet off, she decided she wanted to have underfloor heating installed.

She figured the smart way to handle that project, was to give the task to me, and then jump on a plane to Spain for the fall season ๐Ÿ˜‰

It wasn’t really a difficult project as it mostly meant organizing people to come over to do the work. But even so, it turns out B and I spent a lot of hours on this.

So lets get on with it shall we?

As the main part of the house was being “torn up”, we had to pack everything away into one bedroom. I feel sooooo sorry for that bedroom, we filled it to the brink, and you could hardly get in the door, by the time we had emptied the living room/dining room/kitchen area. It took us two days to empty it all (yeah.. we (read: me) wear out easy).


As the engineered wood floors she had before was only about three years old, our plan was to reuse the flooring if possible.

When we had it all cleared and ready, the hardwood floor people came over to remove the old flooring. To make sure we kept the budged, B and I helped as much as we could. It was kinda cool, because I learned a thing or two about removing old flooring your want to keep. And, guess what.. we managed to salvage all of the floor.

Turned out the were old linoleum underneath, which B and I tore out on our own…. and oh boy… was it dusty… but sooooo much fun ๐Ÿ˜‰

When it was all torn up, we found that the concrete floor underneath it all, wasn’t all that even ๐Ÿ˜ฆย  After a bit of discussion with the electrician and the floor people, we concluded that the only way the end result would be half decent, was to have the floor leveled. Which happily was something the floorers could help us do.

They took of to get their floor leveling gear, while B and I got rid of the old linoleum at the recycle plant. And then met back up a couple of hours later.

I helped with priming the floor while B helped carry all the bags of self leveling compound/concrete (yeah.. heavy work.. which I was staying well away from ๐Ÿ˜‰ )

Day four was dedicated to mixing and leveling the floor. We helped with the mixing of concrete, but left the leveling to the experts.

Day five was a follow up day to level off the last bits and pieces.. and then all we could do for a few days was to leave it all to dry.


I am so impressed with the products they have today.ย  They give you the opportunity to add heating to the floors without having to put down heavy cables.

The electricians needed only one day, first they put down some underfloor mats (0,6mm) that keeps the heat from going into the concrete below (the green you see). Then they added the super thin underfloor heating film which is only a few millimeters thick. On top they put a thin layer of plastic, and then it was time to put the wooden floors back in.

After the floor was all done, the electrician came back to test that all was OK with the floor, and to finish the rest of his work. (yeah we had a little list for him ๐Ÿ˜‰ )

And then it was time.. to clean it all up and put the house back together again!

Funny thing.. it almost took us longer to put it back together again, that it took to take it apart..ย  strange how that is ๐Ÿ˜‰

So now it’s back as good as we can get it… I’m sure my stepmom has to rearrange a book or two… but hey… we gotta leave a littleย for her to do.. wouldn’t you say?

Now the kicker… when you walk in today it looks exactly the way it did a few months back.. the only difference is an tiny thermostat on the wall.ย  Good thing I’m adding some pictures here, it’s the only proof we’ve been up to anything at all, lol ๐Ÿ™‚


Back in the groove of things!

It’s been a while… I know, one of these days you’ll get sick of hearing me say this, I’m sure.

With my head playing up like it’s been doing the last few months, I’ve learned that I have to pace myself when doing things.

Even though you haven’t heard from me in a while, it doesn’t mean that B and I haven’t been up to anything ๐Ÿ˜‰

We have been a little busy actually! Mostly doing other people’s stuff.

This is a quick recap of what we have been up to since you heard from me last:

  • I’ve been dealing with insurance stuff for my step-mum, after a young man hit her car and ran away without leaving a note (thankfully there was a witness).
  • We have been flexing our handyman skills at a friends place, installing a couple of ceiling lamps, changing door handles and oiling up a couple of doors and swapping out some reeeaaaallly rusted outdoor ventilation covers.
  • We have helped my neighbor with moving some clothing cabinets, installing a couple of bunk-beds and a desk. Mostly just helped her set up her daughters room so it’s easier for them to share a room and still have a private corner.
  • My stepmom wants heated floor in her condominium. This task has turned out to be a bit more work than we though.. and deserves a blog-post of it’s own ๐Ÿ˜‰
  • I’ve been dealing with a lot of admin stuff related to the row of townhouses I belong to (which is still an ongoing task, not quite settled, yet)

Have we done anything for us?

Well yes, as a matter of fact… we have.

You might remember from earlier this spring that we built a patio at a friends house? From that job there was some leftover decking material.

I’ve had a couple of plans for those leftovers, among them I wanted to build a “big” planter/storage box. So about a week ago, we kinda finished that box ๐Ÿ™‚ It’s on wheels so it’s easy to move around (it would be impossible without wheels, as it’s large enough that you would need three super strong men to move it, if it is ever filled with soil and plants). ย I will be using it as a combination planting table and storage box for material, like pots, mulch, sand etc.

As I’m planning on using it as a storage box and as a planting table, I need to add a lid at some stage. A lid with not only keep everything inside dry, but also give me a surface to use as a table. I haven’t quite figured out what I want make the lid from yet. I’m thinking either treated plywood, or maybe try to make a lid with the leftover decking. When it’s done I’ll show you, but for now you can see how the box looks today. I’m really happy with how it turned out ย ๐Ÿ˜‰

So what about decluttering?

You would think that with all the stuff going on for everyone else, that I took a declutter break! And in a way you would be right ๐Ÿ˜‰

My decluttering has been a little on and off since you last heard from me. A little here, a little there….

Some of it has made it out of the house.. I’ve got pictures ๐Ÿ˜‰

But some are still hanging around in my catch-all room (guestroom) – gotta take pictures for the blog and all, you know ๐Ÿ˜‰

So what has actually made it out of the house?

1 concrete side-table – sold today
I box filled with decking cutoffs
49 old no longer usable decking boards
(the rest ย of the stuff in the car is old flooring from step mums place.. so that’s not mine to count ๐Ÿ˜‰ )
21 books

Out-the-door = 72 items

Which brings my grand total for 2017 to 1017ย ๐Ÿ™‚ย 


Guess this is it, for now! You should be all caught up.. kinda ๐Ÿ˜‰ So hang tight.. and I’ll see you soon!

21.9 – Throwing the rules out the window!

day-9We’re at day 9 of my 21 day declutter challenge.

I think we all agreed yesterday to throw the challenge rules out the window ๐Ÿ™‚

And today I’m doing exactly that!

About 1,5 years ago I changed my bathroom routine! I switched from regular store bought products, to more natural/organic and homemade products.

I simplified my hair styling (not that I ever really did much of this anyways), and stopped using all sorts of junk in my hair. I moved from regular shampoos to pretty much no shampoo, and the few times I use shampoo, it’s Lush solid shampoo bars (which btw, are great for travel).

I switched from junky deodorants, to Lush solid deodorants, and the last year I’ve almost eliminated deodorants all together (only use it when I really, really have to).

I also started to mix my own facial and body oils instead of using regularย store bought moisturizers. I really like using organic and natural oils, so there is no way I’m ever going back. Which means there are stuff in my bathroom, that needs to go.

So here we are… 22 items going out-the-door!

21-day-9-c

Some of you might notice that there are a couple of items in the picture that are somewhat more natural and sustainable products… so why haven’t I used them up first? Well… did I mention I really, really like my own oils… ๐Ÿ™‚


I’m being joined in this challenge by:
– Barb, at Decluttering The Stuff, is on day tenย or something.
– Melinda, at PurpleSlobinRecovery, you gotta read her declutterathon. I love the inner/outer dialogue. This is so me sometimes…
– Grace, atย The CFO MOM Blog, she has gotten a big box of stuff out of her house.
– Jen, at The Hidden Hoarder, she is on day eight, would you believe she is at 329 items already!

Preparing for the Holiday season!

It’s that time a year, where everyone is scrambling around like “Looney Tunes” trying to get everything done before the holiday starts.

And I can’t say I’m any different. Just a week ago, I thought I had all the time in the world, all I had to do was clean the house, wrap some presents, buy some food and a Christmas tree, and decorate a little and I would be done. But somehow, somewhere along the way, I’ve ended up with, not enough time, before Christmas.

It might have something to do with doing errands for everyone else BUT me! Let me explain;

It’s coming down to the wire at my step-mums new place, the people that are doing the renovation should be more or less done. So much so, that we have had to go down several times this last week, just to keep an eye out and point out the things that are missing or that we are not happy with. For some reason, ever time we are there, 2-3 hours goes real quickly.

While hanging around the new place, I was told that I had promised that I would fix up the new front door with some teak oil! I can’t quite remember that, but I’m sure it must be right, guess it slipped my mind ๐Ÿ™‚ Giving a couple of things that the workers have not done up to specifications, ย I can see a few other tasks that will be coming my way also, right after the holidays… among them, putting the kitchen fronts (we picked them up this week) back on the cabinets.

Yesterday, the family all had lunch together, and somewhere during the conversations it seems like I got another handyman job or two for my step-sister as well…. there was some lamps that needs to be hung, some TV cables that needs to be extended and hidden?

Even a bed frame I needed to pick up at a store because her car is not big enough!!! And for your information, I drive a convertible, a huge car, not… and hers is bigger than mine… I think they found out that if I took the top of it would work out perfectly ย for the transportation. I’m telling you, there is nothing that will be transported in my car as long as it’s raining outside ๐Ÿ˜‰

So you can see how I went from thinking I had all the time in the world, to suddenly not… I did however find the time to get a Christmas tree, one for me, and one for my step-mum ๐Ÿ™‚

Today though, I’m putting my foot down!

I needย a day to sort out a few things, to;ย clean my house, change my bed, wash some clothing, iron, in general tidy, wrap some Christmas gifts and maybe even consider starting to put out some of my few Christmas decorations.

So that’s what I’m doing today! And now my washing machine is yelling at me that it’s done, so I gotta run…

See ya!!


A new property…

My step mum have bought herself a new place to live. It’s on the 3rd floor of a 7 floor building, and it’s a bit of a rehab project!

There is a lot of things that needs to be done to it and fortunately she have found some workers that starts on Monday. They will take care of painting the ceilings and walls, opening up some walls, changing the wooden floors, tear down some old cloths cabinets and a few other bits and pieces.

Even so, I’m sure there will be more than enough small projects for the rest of us to do ๐Ÿ˜‰ Like yesterday!

The kitchen needs a tiny overhaul (cherry colour, with worn out kitchen counter). My step mum wants it white and bright. So we have decided that the easiest way to refurbish it, is to keep the original kitchen (as the units are pretty OK), and paint it.

So yesterday a friend of mine and I went over there to take down all the kitchen cabinets doors and drawer fronts, as they are to be delivered to a place that specialize in spray-painting old kitchen units. All the fittings had to be removed and the fronts had to be cleaned thoroughly to make them ready for the paint place.

Even though it’s not a hard job or a difficult job, I have found that regardless of what it is that has to be done in a house, it always seem to take much longer than you originally think ๐Ÿ˜‰

Tomorrow ย we are delivering the fronts to the paint place, and I believe we will get them back in about a week or so… so I guess I know what the next weekend project might be ๐Ÿ˜‰ย ย After the other workers are done with the painting, mind you…

Hmmmm, seems like I can’t seem to escape from kitchen projects ๐Ÿ˜‰

2014-10-17 15.06.362014-10-17 15.06.48


Kitchen – Day 8

Seriously! You’re still at it? I thought you were done? I can hear you wondering ๐Ÿ˜‰

Well, yeah! I am actually done ๐Ÿ™‚ For those of you that think this job have taken forever (which it did), day 8 was actually Monday this week. There was just a few days I was too tired to even write about the days work, that it’s taken me a few extra days to get it all out here on the blog ๐Ÿ˜‰

Day 8 – clean up day!

The last day of kitchen work was pretty much dedicated to getting the last bits and pieces in order.

I decided that since I was going to do all this work on the kitchen, I might as well do the yearly cleaning of the kitchen at the same time. You know, that job where you empty everything in your drawers and cabinets, and wash the units and the stuff in the unit.

After using the grinder on the kitchen counter, there really wasn’t much choice in the matter. There was this fine layer of laminate dust on the shelves in my upper cabinets, so I just went ahead and washed them down, and put the glasses and plates through a quick cycle in the washing machine (some got washed by hand). And at the same time did all my other kitchen shelves and drawers. It’s nice to get a completely clean kitchen and knowing that everything inside the cabinets are all neat as well. Christmas cleaning – check ๐Ÿ˜‰

After everything was nicely put away and I had my kitchen back, it was time for that last crucial detail that needed to be done. Caulking (with silicone) around the countertop to make sure no water could go were it shouldn’t go.

Since the crack between the countetop and the backsplash, was barely there, I decided to use blue tape to help me out. I taped the kitchen counter and taped the backsplash, so only the crack to put the clear silicone sealant in, would be open. This helped a lot in being able to push silicone into the crack without being worried about getting any mess on the countertop or backsplash. ย If I may say so myself, the end result is really nice. You can’t really see that there is any silicone there except for a little bit of glitter when the light hits right.

I used the same idea when putting in the silicone between the wall and countertop, and side cabinet and countertop. It gave me the opportunity to really mash as much as I wanted into the crack without making any mess whatsoever ๐Ÿ˜‰

One final wipe of the kitchen counter, and that concludes the kitchen project 2014.

I have to admit, it’s been a lot of work, just to have your kitchen end up looking exactly like before. But at least now I have a functioning sink + LED light instead of halogen lights, so if nothing else, my electric bill should hopefully be better ๐Ÿ˜‰

2014-11-06 13.49.57


Kitchen – Day 7

Cooktop and oven time.

As easy as the plumbing was, the harder this was…

What we needed to do was cut out the hole for the cooktop. First we measured everything out. We put the cooktop upside down on the counter, in exactly the spot where we wanted it, drew a line around it, removed the cooktop and measured about 6 mm in from the line we drew, and drew up the cutting lines. The cooktop “lip” was only 10 mm, and we needed a tiny bit of wiggle room, so we decided to go for approx 6 mm so that the “lip” still had some support.

I told you my countertop consist of a 10 mm thick laminate, right? Well let me tell you, 10 mm of pure laminate is hard, super hard to cut in. I remember when we installed the original countertop, how my dad swore more than once over how hard is was to cut the darn thing with a jigsaw. Not only was it hard (I believe my dad broke a sweat and a blade) but it also took forever. So this time around I thought maybe I could use something else.

First I tried my Bosch Oscillation multi tool – effective, but still very slow going, so I figured… nahhh.

OK, what’s next…. well there is the grinder… Which is a scary effective product, and it’s fast, almost too fast. “Boy do you need a steady hand if your going to try that, because if you are just a tiny bit off, you’ll ruin everything”. Hmmm, would I, would I even dare to? ย Thankfully I still had the cut off from the original plate, so I could practise ๐Ÿ™‚ It was fast… I decided to take a chance..

NOW, I would NEVERย recommend anyone ever doing this, you would have to have a rock steady hand, and a sick amount of confident, and it can still go wrong, very wrong! So NO, do not ever use a grinder to cut out the hole for a cooker in a kitchen bench. Please use a jigsaw as the instillation guide will tell you to do.

Having said that, I used one! The only reason I even contemplated using one, was because I spent all summer last year cutting slate with a grinder (Summer project 2013 – putting down 56 square metres of slate at the front of my house). And I knew I could cut a straight line. Unless you use a grinder for a living, please do not be as insane as me ๐Ÿ˜‰

I knew the grinder would produce an insane amount of laminate dust, so we covered up the area really well to try to keep the dust contained. Even so, it still seeped a little into my kitchen cabinets and onto the floor. ย This was not really a big deal, as I had decided that part of the kitchen “renovation” would also include cleaning all my kitchen stuff, and all my kitchen cabinets (saves me from doing it for Christmas).

OK, here goes, I’m all decked out in protective gear, mask, glasses and ear protectors. The kitchen is all decked out in plastic, tape and I have this big “bag” behind me that will collect most of the dust. And, I’m nervous! What if I muck this up?

Well, I’m proud to say – I didn’t ๐Ÿ™‚

The hole got cut, and fitted to perfection. The cooktop slotted nicely into it’s hole, exactly as planned. Phew…

Putting the oven in it’s place afterwards took all but two minutes.

A good vacuum, and a washing later andย this concluded the work for the day.

Only one more day to go…

20141105-085846.jpg

Kitchen – Day 6

Sink time!!! I have to admit, it was nice getting the sink back in order, it was getting a bit tedious having to run upstairs every time I wanted some water ๐Ÿ™‚

Day 6 was dedicated to installing the tap and installing the plumbing for the kitchen sink and dishwasher. It was a little bit of fiddly work, but kinda fun.

First one out was the tap! My new sink is not quite the same as my old one (the old one had gone out of production), so the measurements are a little different, and because of this, the hole for the tap was not quite in the same place as my old one. So we had to do some adjustments to the piping to make everything fit. It’s not difficult work, but for some reason (just like with everything else) it’s time consuming. ย It was wonderful getting the tap in, tested out and have everything work like a charm.

Sink time! Remember I had practised where all the plumbing would go? Well, this served us well. It made the installation much quicker and easier since we knew which pipe had to be cut and knew which pipes to connect to each other. It didn’t take long before the plumbing for the sink was in, and it was time to test everything. and presto… no leakage, hurray!!!

Dishwasher next, this actually took a minute, not because it was difficult to install the piping and water, but because we had to spend some time getting the machine just perfectly situated in it’s spot, level it out and fasten it to the countertop, to make sure it didn’t move while pulling at the door.

Day 6 concluded with functioning tap, sink and dishwasher… I’m back in business ๐Ÿ™‚

2014-11-03 10.02.05

Kitchen – Day 5

After our rather stressful day 4, our next task – putting in the new countertop – was almost (I said, almost) easy.

We had decided that the task that day, would be put in the countertop, and then relax! Little did we know it would take longer than we thought ๐Ÿ˜‰

My countertop consists of a 10 mm thick laminate + a 30 mm thick aluminium list. To support the laminate, there are some support bars across the underside of the countertop. As you can see from picture 1 below. These support bars are normally spaced so that they will rest on the under cabinet walls, to make everything really strong and supporting. ย On the original countertop, the support bars were placed correctly, on the new replacement countertop, they didn’t bother about taking this consideration, and it turns out the support bars were in the wrong place. As an example, one of them was right smack in the middle of where my cooker was supposed to go!

Well, that would be an easy fix. Right? Ehhh, nope! Not only was the support bars screwed on, they were also super-glued to the laminate! I think it took me half an hour just removing the one that was “in the middle of my cooker”. Oh, no… was this looking to be a long days work after all…

We decided that rather than move the other ones to the area that they needed to be, we would just addย bars instead. So that’s what we did, we used the one we removed and stole one from the old countertop ๐Ÿ˜‰ And what you see on picture no 1, is a countertop ready to be installed.

The installation it self wasn’t hard work, we had to juggle it a little to sneak it in between the cabinet and the backsplash above. But! Turns out I had not managed to remove enough of the old silicone that was used for the old one, so the new one wouldn’t go all the way to the wall. Darn…

Not allot of ways around that one, other than spend the next half hour, cleaning away all old silicone, and then give the wall a quick repaint to make sure it’s protected.

Have a coffee break and try again…

Second time around, woohoo, ย it fit ๐Ÿ™‚

Wonderful! So we pulled it out again, put some silicone at the wall, and underneath the backsplash fittings and showed the countertop back into it’s place. And the next half hour was spent fastening the countertop to the cabinets, just to make sure it ain’t going anywhere ๐Ÿ˜‰

So NOW we could have a well deserved home-made apple juice break!!!

Followed up by a little clean-up! And as you can see, I’m putting my friend to work ๐Ÿ˜‰

2014-11-02 10.43.42